Why Fixing Dings Matters
Every surfer has been there — you bump your board against something, and suddenly there’s a small crack or dent on the surface. Even minor dings can let water seep into your board’s foam core, causing delamination or structural damage over time. Learning how to patch a ding at home not only saves money but also helps extend your board’s life and performance in the water.
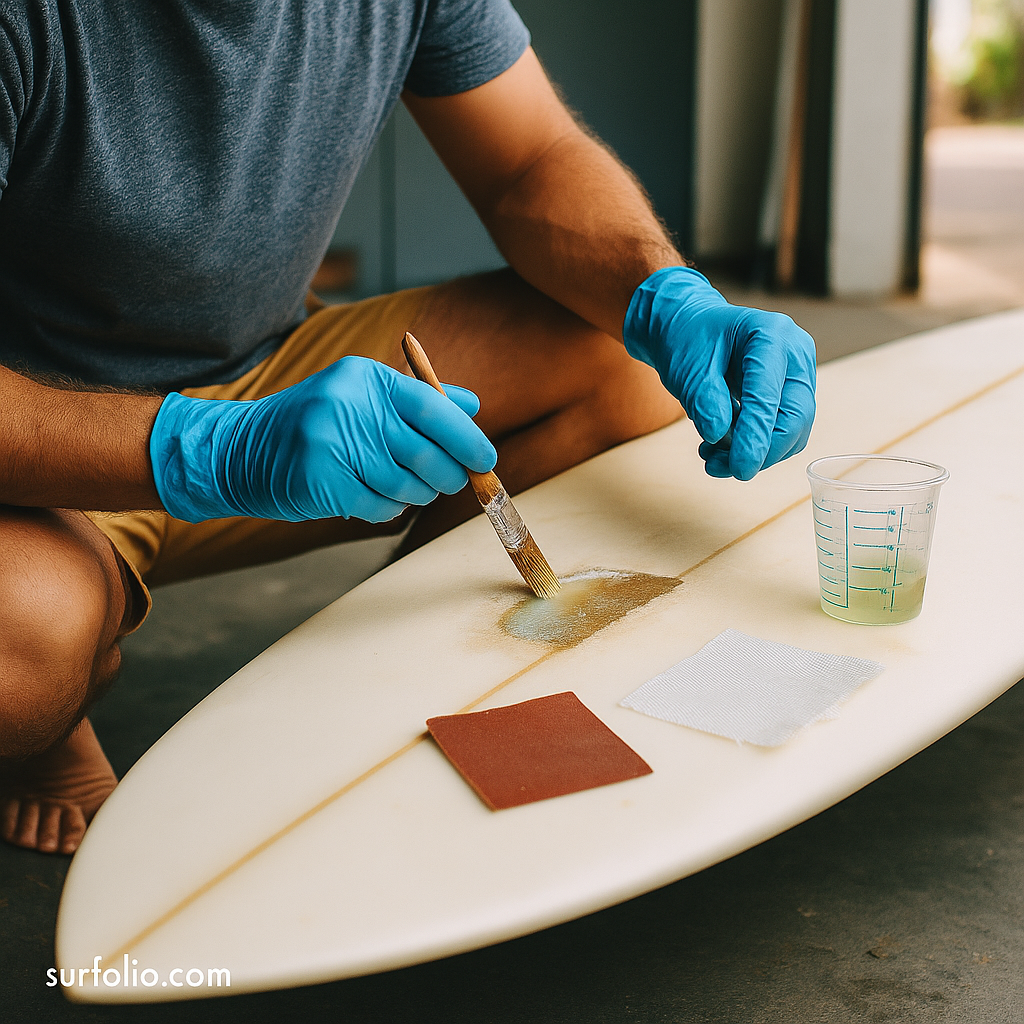
What You’ll Need
Before you start, make sure you have the right materials. You can buy a surfboard repair kit from most surf shops, or put together your own using these essentials:
- Resin: Use polyester resin for PU boards or epoxy resin for EPS boards (check your board type first).
- Fiberglass cloth: Adds strength and structure to the repair.
- Sandpaper: 80-grit, 150-grit, and 220-grit for smoothing.
- Masking tape: To keep resin contained.
- Razor blade or small knife: For cleaning the damaged area.
- Mixing cup and stick: To combine resin and hardener.
- Gloves and safety gear: Resin fumes can be toxic, so work in a well-ventilated space.
Step-by-Step Guide to Patching a Ding
Step 1: Clean and Dry the Area
Before repairing, ensure the ding is completely dry. If you’ve been surfing, let your board sit in a shaded, well-ventilated area for at least 24 hours. Remove any wax, dirt, or salt using a wax comb and mild cleaner.
Step 2: Sand the Damaged Spot
Use coarse (80-grit) sandpaper to roughen up the area around the ding. This helps the resin adhere properly. Be gentle — you just want to create texture, not make the hole bigger.
Step 3: Remove Loose Material
With a small knife or razor blade, cut away any cracked or soft fiberglass pieces. The goal is to have a clean, solid surface for the repair.
Step 4: Tape Around the Ding
Apply masking tape in a small border around the damaged spot. This keeps the resin from spreading over undamaged parts of your board.
Step 5: Mix and Apply Resin
Mix the resin and hardener according to the instructions on the package. If your repair kit includes fiberglass cloth, cut a small piece to fit over the ding. Apply a thin layer of resin, place the fiberglass over it, then brush on another light coat of resin.
Step 6: Let It Cure
Set your board in a warm, dry place away from direct sunlight. Let the resin cure completely — usually between 4 to 8 hours depending on temperature.
Step 7: Sand and Smooth
Once cured, start with 150-grit sandpaper and move to finer 220-grit for a smooth finish. Blend the patch with the rest of your board’s surface until it feels even.
Step 8: Final Touches
If you want a polished look, apply a tiny amount of resin as a topcoat and let it cure again. Remove the masking tape and give the repaired spot a final light sanding.
Quick Repair Option: Sun-Cure Resin
For small surface dings, sun-cure resin is a convenient alternative. It doesn’t require mixing — simply squeeze it into the crack, smooth it with a plastic card, and let it cure in the sun for about 10 minutes. Perfect for on-the-go fixes when you’re traveling or mid-trip.
When to Visit a Professional
While DIY repairs work great for small to medium dings, larger cracks, delamination, or deep punctures should be fixed by a professional shaper or repair shop. If water has already soaked into the foam core, it’s best not to risk it.
Final Thoughts
Knowing how to patch a ding at home is one of the most valuable skills a surfer can learn. With a little patience and care, you can keep your board watertight, strong, and ready for the next swell. Remember — a quick repair today can prevent major damage tomorrow.